很多對電腦硬件有些知識的朋友,常常都被身邊的朋友問,哪款手提電腦適合我自己使用? 哪款品牌比較耐用? 哪款手提電腦的速度比較快? 筆者有一日逛電腦商場,比較一下手提電腦價錢,無意中,筆者聽到有一位OL女士和一位手提電腦售貨員的一些對話。
OL女士: 你好呀!我想要買一部手提電腦。
售貨員: 無問題!你有什麼要求,我可以介紹一部適合你的手提電腦。
OL女士: 我想要部快一些,輕便些及價錢便宜些。
售貨員: 咁你部手提電腦會用來做什麼工作?
OL女士: 我主要會用來外出工作,用來做文書工作、上網、打網絡遊戲、煲劇睇高清影片、另外還會用圖像軟件來編輯相片來放上FACEBOOK啦!
售貨員: 咁你有冇之前用開邊隻牌子?
OL:
我之前沒有用手提電腦,不過無所謂架,而且我咩都唔識!
最後,個OL女士沒有購買到手提電腦,而且個售貨員仲一肚氣,然後我偷聽到個售貨員同同事講,頭先個客運吉,浪費我啲時間,又話價錢唔係優先考慮,介紹依部又話貴, 個部又話重外型又唔好,好啦,介紹啲Tablet Size 手提電腦,又話唔夠快,又話容量唔夠,真係難服待,攪佐成個鐘,今日都仲未開到單,粗口@@#&@$*&^。
有見及此,筆者寫了這篇文章,試圖分析下每位用家應該選擇那些手提電腦才合適,並且講解一下購買手提電腦的要點。
1. 價錢 - 購買前一定要了解自己適合的手提電腦價錢,最好自己能夠負擔到。
2. 操作系統 - 目前主要分2大主流,分別為是Microsoft Windows及Mac OS (另外,還有Google開發的Google Chrome OS,這裏不作深入討論)。例如使用者使用Mac OS的話,都必定會購買由Apple生產的MacBook / MacBook Air / MacBook Pro,而選擇使用Windows作業系統,市面上有很多品牌選擇。
而 Windows 也會分家用版、專業版及企業版,專業版及企業版主要是增強商業上的應用及系統安全的兩大範疇,大家可以參考Microsoft的連結
https://www.microsoft.com/zh-hk/windows/windows-10-editions
3. 品牌 - 是一個非常重要的因素,很多時我們會聽到那一個品牌的手提電腦較為耐用,售後服務較為好等等...... 一些大品牌,例如LENOVO, DELL, Fujitsu等等...... 它們的顧客服務公司設立在本地,使用者不用將有問題的電腦寄到海外維修。
4. 外觀 - 一個比較主觀的因素,例如機身顏色及外殼質料,以筆者為例,我只會選擇黑色機身或合金外殼。
5. 重量 - 如果要攜帶出外工作,重量是一個十分重要的因素,因為不是每個人都有足夠的耐力去攜帶一台大約2KG的手提電腦在外工作,一般性能的手提電腦大約重1.7KG~2KG左,高階電腦可以超過2KG,而不足1KG的Ultrabook包括有Apple MacBook、Microsoft Surface Pro、SONY VAIO Pro 11 等等...... 使用者應該按照自己的需要選擇不同重量的手提電腦。
6. 電池的續航力 – 有些使用者為了減輕重量負擔,有時不會攜帶手提電腦火牛,因此電池續航能力也是十分重要的一還,以MacBook Pro為例,它可以長達 10 小時無線上網及長達 12 小時 iTunes 電影播放,使用者可以在官方網站參考電池續航力的數值。
7. 顯示卡 - 除非你是遊戲玩家或3D製圖等,如果你只是看高清影片及Photoshop的話,即使是最入門的機種,內置的顯示晶片都有足夠的能力應付,現在比較進階的獨立遊戲顯示晶片有Nvidia GTX, GT和AMD Radeon系列。
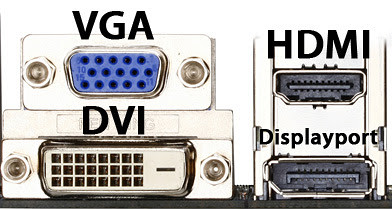
此外,如果要使用手提電腦做公司簡報及推廣活動,就需要留意到手提電腦有沒有並有螢幕輸出的連接埠,現在主要分為5種,VGA, DVI, HDMI, DisplayPort及Mini DisplayPort。
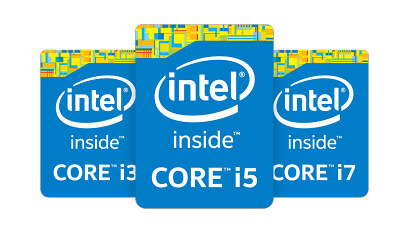
8. CPU 中央處理器
以Intel來說,它會劃分最高級Intel® CoreTM >Intel® Pentium®>Intel®
Celeron®> Intel® Atom。這裏我們只講目前比較常見的Intel® CoreTM
Intel®
CoreTM i7 – 是最高階的CPU,主要用來針對高運算的作業,例如影片制作,軟件開發及繪圖運算等等……
Intel®
CoreTM i5 – 是玩家級的CPU,用來針對大量文書工作、電腦遊戲及相片編輯等作業
Intel®
CoreTM i3及Intel®
CoreTM M – 是入門級的CPU,能夠執行桌上電腦軟體,適合一些文書工作,串流音樂及節目等等......
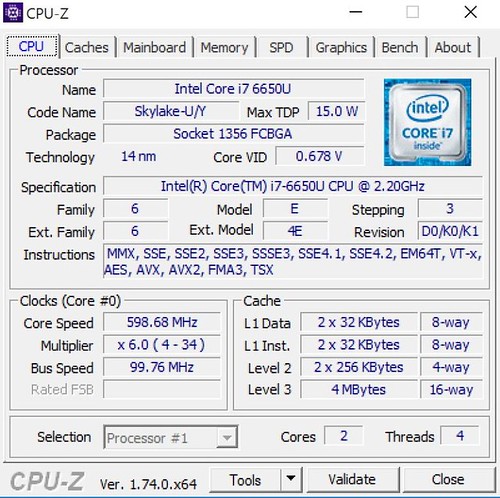
有些初階的用家會問,識別i7、i5及i3比較簡單,但有很多時候CPU會好像以下的格式顯示在手提電腦的廣告上,那麼我如何分辨呢? 筆者以目前 Microsoft
Surface Pro 4 的 i7 CPU 作講解。
一般的CPU顯示方式大致上會是這樣的格式,最初的是Intel Coe是牌子,i7是系列,後面的4個數字是型號,而最初的數字是6,就是代表CPU屬於第6個世代,第5世代的就是5,但要留意第1世代的CPU,它不是寫1作開始,而是會採用3位數而,其餘的數字基本上是愈大愈好的,而數字後的英文字母U是代表超省電筆記型處理器 (TDP ≤ 11.9W),除了U的字母外,還有其他英文字母,詳細可以參考Intel的連結。
此外,括號內的4M Cache是代表CPU的暫存,簡單來說CPU會將要做的情先放到的位置,一般來說愈大愈好的。
最後的up to 3.40 GHz是CPU的主頻,但要留意 i7 的CPU不能與 i5 的CPU比較。另外,還有CPU的核心數目,一般來說核心愈多是愈好,i7 有四核和雙核心,以Surface Pro 4的 i7-6650U 為,它的CPU只是雙核及四個執行緒,i5 有四核心和雙核心的,而 i3 是雙核心的。
9. 硬碟容量及類型
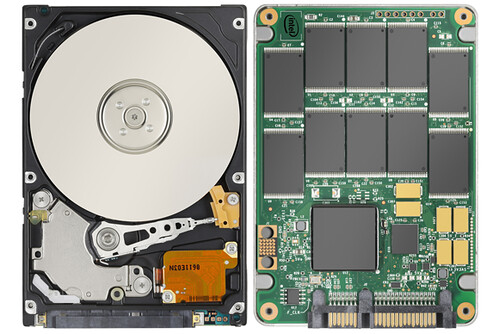
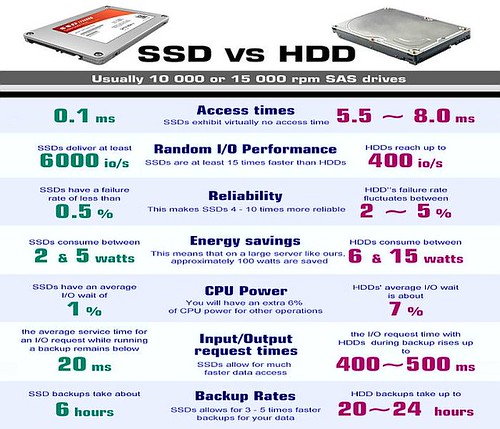
硬碟除了容量外,速度也是一個重要的考量因素,較早前的手提電腦,基於耗電量、散熱功能及晶片技術的考慮,硬碟只採用上 5400rpm 轉速,比一般桌面電腦的硬碟轉速 7200rpm 會慢上不少,而伺服器級電腦的硬碟轉速可以達到 10000rpm 至 15000rpm。
近年來開始流行的 SSD (Solid State Drive) 的推出,中文名稱為固態硬盤,由於開發技術已經成熟,價格已下調了不少,SSD 和傳統硬碟的結構是完全不相同,SSD 硬盤是由一整塊快閃記憶體所組成,而傳統硬碟是由一個或者多個碟片組成,並由機械指針負責從硬碟裏讀寫資料,因此,SSD 的讀寫速度比傳統硬碟為快,操作時的溫度會較低,但目前 SSD 的缺點就是價格還是比傳統硬碟高昂,以及容量是不及傳統硬碟為大(現在最大的 SSD 容量為 1TB),建議對效能有要求的使用者絕對要購買備有 SSD 的手提電腦。
10. 記憶體
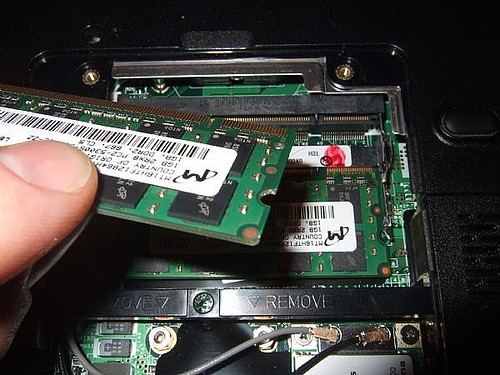
記憶體容量當然是愈大愈好,但對於一般文書工,4GB 記憶體已經卓卓有餘,對於效能有要求的用家,應該最少要有 8GB 記憶體或以上,現在很多記憶體已經焊接在手提電腦的底板中,使用者購買手提電腦時,須要留意手提電腦是否預留記憶體插槽位置,方便日後購置額外的記憶體,一般附設有2個記憶體插槽。
11. 螢幕
電腦螢幕的尺寸大小,同工作效率有直接的關係,尺寸愈大,你就能在同一個螢幕裏看到全部資料,減低使用滑鼠及鍵盤的操作,從而提升工作效率,螢幕尺寸分11”, 12”, 13”, 15”及17”,當然以目前電腦螢幕技術,螢幕愈大,耗電量及重量也愈大。
螢幕解析度的大小,當然愈大會愈好,數值愈大,會讓畫面更清楚更精緻,現時所有手提電腦都會採用 16:9 的螢幕,而解析度大多數分別會是 1920x1080 或 1600x900 及 1366x768,但有些品牌,例如 Apple 的 MacBook Pro 15吋Retina螢幕,它的解析度能達到 2K 即2880x1800,另外,Asus 的 ZenBook Pro UX501 螢幕解析度為 4K 即 3840x2160。
螢幕也會分光面和霧面 2 種,光面的畫面都通會比較細膩,顏色會比較好,但在強光下會產生嚴重的反射;而霧面螢幕則沒有反射的問題,但顏色會比較淡,亮度也會低一點。
螢幕種類也分IPS 及 TN
IPS – 較適合繪圖、相片編輯及對顏色要求十分高的人,色準十分好,偏色問題十分小,但價錢十分高及操作時的溫度十分熱。
TN – 價錢平及反應時間最快,但從不同的角度看會有偏色的問題及色準較差,適合打電玩遊戲人仕。
輕觸式螢幕 – 它能夠讓使用者以手指來取代傳統的滑鼠及鍵盤來操控手提電腦畫面。
12. 連接埠及週邊
例如: USB 3.0, 耳機插孔, Cam, SD讀卡機及Display Port等等,以筆者為例,我需要與同事開簡報會議及需要從相機滙入相片作編輯處理,我要求手提電腦需要備有 2 個或以上的 USB 連接埠, SD 讀卡機及 Display Port。
現在,有很多品牌為了減低手提電腦的厚度,會刪減網路連接埠,使用者需要留意。
13. 購買地方
一般來說,有 3 種途徑可以購買,大型連鎖電器商店、網上商店、電腦商場。
大型連鎖電器商店 - 他們一定會有信譽,擁有行貨保養,價錢可能會比較高一些,但他們會有其他繳費模式或優惠,例如信用卡分期、積分優惠等。
網上商店 - 現在許多品牌的手提電腦商(Dell、Lenovo)及大型購物網站(Amazon)都會提供網上商店服務,客人選購後會,貨品會直接被送到顧客府上,從而節省時間。
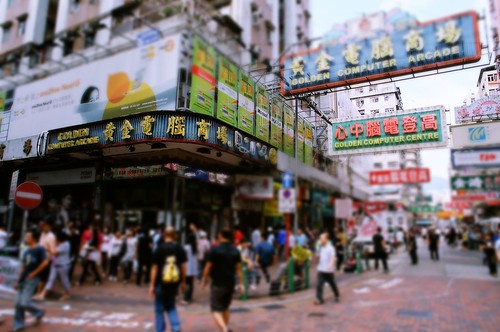
電腦商場 - 香港最著名的有深水埗黃金、高登電腦商場,灣仔電腦城等,價錢會比大型連鎖電器商店便宜一點,但要留心行、水貨的分別。
總結
希望這篇文章能夠幫到大家有關於購買手提電腦要注意的地方,筆者已經採用了深入淺出的方式去表達比大家,如有什麼問題可以隨時發問,筆者會盡量解答,不過,並不要奢望完全不懂電腦的人看完這篇文章後,就會變成一位選購手提電腦的專家,正所謂科技一日千里,文中的元素可能會過時,但總算讓大家能對電腦有了一定的基礎知識及有點概念,這就是筆著最想見到的地方。